

An necessary device for writing high quality Android apps is a set of automated Unit Checks to check your app.
These automated exams have a number of advantages, together with:
- They drive you to grasp the items of performance you’re growing.
- Making an app testable pushes you to have a greater structure in your app.
- They scale back the period of time it is advisable spend on guide regression testing.
- They let you do regression testing steadily — decreasing bugs and catching new ones earlier.
- They provide you a device to fearlessly refactor your code because you’ll be assured you haven’t added bugs.
On this tutorial, you’ll modify a Cocktails trivia sport by including unit exams to it.
Automated testing includes a number of various kinds of testing along with unit testing, so first take a look at how unit testing matches in with different forms of testing.
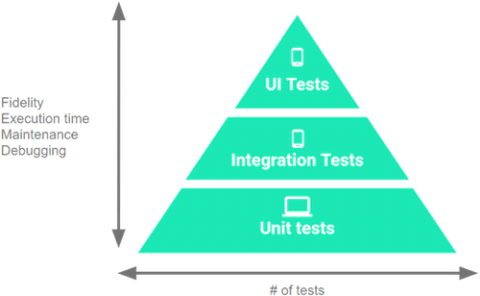
The Testing Pyramid
Checks you may embrace in your app’s take a look at suite are categorized into three totally different classes:
-
UI Checks:
These exams work together with the UI of your app. They emulate the consumer conduct and assert UI outcomes. These are the slowest and costliest exams you may write as a result of they require a tool/emulator to run. On Android, essentially the most generally used instruments for UI testing are Compose Check, Espresso, and UI Automator. -
Integration Checks:
Use these when it is advisable verify how your code interacts with different elements of the Android framework however with out the complexity of the UI. They don’t require a tool/emulator to run. On Android, the commonest device for integration testing is Robolectric. -
Unit Checks:
The system below take a look at (SUT) is one class and also you focus solely on it. All dependencies are thought-about to be working accurately (and ideally have their very own unit exams :]), so that they’re mocked or stubbed. These exams are the quickest and least costly exams you may write as a result of they don’t require a tool/emulator to run. On Android, essentially the most generally used instruments for unit testing are JUnit, Mockito, and MockK.
As a basic rule, you need to intention to have the next cut up between the take a look at classes in your challenge:
- UI Checks: 10%
- Integration Checks: 20%
- Unit Checks: 70%
As a result of the talents wanted to put in writing Unit Checks present the foundational expertise for writing Integration and UI exams, this tutorial will give attention to them.
Notice: This tutorial assumes you have got earlier expertise with growing for Android in Kotlin, and that you’re conversant in utilizing Compose and Kotlin corountines. In case you’re unfamiliar with the language, take a look at this tutorial. In case you’re starting with Android, try a few of our Getting Began and different Android tutorials.
Getting Began
Obtain the supplies for this tutorial by clicking the Obtain Supplies button on the prime or backside of the tutorial. Then, open the starter challenge in Android Studio Hedgehog or later.
You’ll work with a Cocktails trivia sport that exhibits numerous cocktails and asks you to guess the title of them.
Construct and run. Right here’s what you’ll see:

The challenge comprises quite a lot of parts, together with:
- MainActivity.kt: Comprises the principle exercise for the app.
- CocktailsComposable.kt: Comprises the composables for the app.
- CocktailsViewModel.kt: The ViewModel to bind the view to the sport, and knowledge.
- Recreation.kt:This holds the information for the sport in addition to some helper strategies to carry out actions within the sport. Positioned in sport ▸ mannequin.
- Query.kt: Holds knowledge a couple of query and has summary strategies for answering a query. Positioned in sport ▸ mannequin.
- Rating.kt: Class for holding the rating and incrementing it when a query is answered accurately. Positioned in sport ▸ mannequin.
The ultimate app will do the next:
- Load a listing of cocktails from the web.
- Generate questions from that listing and retailer them within the
Recreationobject. - Retrieve the primary query and current it to the consumer.
- Enable the consumer to pick what the reply is to which cocktail they assume it’s.
- Increment the rating if the consumer’s reply is right.
Elements You Shouldn’t Unit Check
The very first thing it is advisable think about when testing is that if a element you’re engaged on can’t or shouldn’t be unit examined.
If a element falls into one among these classes, it’s not a great candidate for unit testing:
- It has dependencies on the Android Subsystem.
- It has dependencies on an exterior element with a fancy interface.
- The logic within the element can’t be moved out into one other object that doesn’t have dependencies on Android parts.
Within the starter challenge, three information clearly fall into these classes:
- MainActivyt.kt: An exercise is tied to the app lifecycle and Android subsystem.
- CocktailsApplication.kt: An app class has many dependencies on the Android subsystem.
The shortcoming to unit take a look at logic in these information is among the causes that good structure patterns advocate breaking out logic into different parts. As you construct the performance in your app, you’ll find out about issues that make a element a great candidate to check.
Writing Your First Unit Check
Getting Context
As a primary step, you’ll implement the performance to show a query. This app makes use of Compose views. Open the CocktailsComposable.kt file and take a look at what it’s doing. This comprises the complete interface you’ll want to your app. You’ll have to implement the logic in your viewmodel to offer it the information it wants. Look in the course of CocktailsScreen, the primary composable within the file, and also you’ll see:
LaunchedEffect(Unit) {
  cocktailsViewModel.initGame()
}
That’s the entry level to your viewmodel. Now, lookup a number of traces and also you’ll see this:
val query = cocktailsViewModel.query.collectAsState().worth
That is getting a reference to the present query in a StateFlow from CocktailsViewModel to make use of in the remainder of the display.
Now open CocktailsViewModel. Presently, your viewmodel isn’t doing loads, however some helpers have already been offered for you. Everytime you play a sport, a brand new Recreation object is created. Open the Recreation.kt file situated in sport ▸ mannequin.
The 2 necessary issues to your first activity are your listing of questions and your helper methodology to get the subsequent query which you’ll want to make use of in your viewmodel. nextQuestion() is at the moment not applied, so that you’ll begin writing a unit take a look at for this.